I find it to be a very useful organizational tool to store my ideas and content. At our first Pedagogy First meeting we will be using LiveBinders to develop our 7 Habits of Digital Citizenship Curriculum for our school.
I have developed a LiveBinder with tabs for our 7 Habits of Digital Citizenship. Our team will be adding grade level appropriate activities based on each habit to the LiveBinder. Once finished this will be a tool that our staff can use to assist them in teaching Digital Citizenship.
Some things you might want to know:
What is a LiveBinder?
Check out this introduction to LiveBinders.
Watch this video on Introduction To Livebinders
To recap, Livebinders is a digital 3 ring binder that you can put virtually anything into; webpage, PDF, document, image, or video. Everything is organized by tab and you can even have subtabs within those tabs.
For example here are some public binders that you may find useful.
Getting Started:
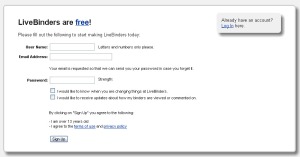
(Here are some instructions from Steven W. Anderson to help you get started using LiveBinders)Getting set up is a breeze. Accounts are free and all you need is a username, password and an email address. (Don’t worry, they wont send you anything, unless you want the newsletter. The email just for password retrieval.) Once you have that you land on your shelf.
From your shelf you can view any binders you have previously created or you can begin a new binder by clicking the Create Binder tab at the top.
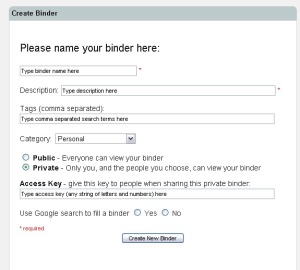
When you create a new binder you have a few options:
•You of course need a title and a short description of your binder.
•You can also tag it which makes it easier to find when folks do a key term search for content.
•Choose your category (although most will go in the education section you can see there are loads of other great categories).
•You get the choice of making your binder public (so it is searchable) or private (seen only by you) by selecting the appropriate button.
•Then there is the access key. If you create a private binder you can create an access key that will give others the ability to view your binder. Helpful if you want people to review the information but don’t want the binder public.
•Last option is to fill your binder with a Google search. If you choose this option, when the binder is created it will have the first 7 search results from Google already in your binder. (Such a handy feature!)
Can you still add other content you ask? Well sure! This is a fast and easy way to start off your binder with a little bit of content.
Once in your binder you will see your tabs at the top.
1.Click a tab to get started. Generally you are going to put links in your binder.
2.When you have selected a tab insert your link and click the button. Boom! Inserted. Each tab has a menu that will allow you to move your tabs, delete the tab, add a sub tab (which behaves the same as a regular tab) and open the advanced menu.

In the advanced menu there are several customizable features.
•Here is where you add other media like docs, spreadsheets, audio, video and PDFs.
•You can also change the layout of a page. The default is the one column with the webpage. But there are so many other options like titles, text and media and tables.
Definitely spend some time here going over the different layouts.
When you are ready you can share your binder with the world. You have several options:
•You can email, send a tweet, like it on Facebook, get the embed code or present it right there in a nice clean browser.
•Also when you are on your shelf you can grab the link and embed code to the binder without ever opening it.
Livebinder It Tool
This little bookmarklet changed my life and how I use Livebinders. This sits in your bookmark bar waiting for you to add pages to a new binder or an existing one.
When you come across something you want to add to a binder click the Livebinder It button and you get a new window. (If you aren’t logged in you will have to do that first.)
•Then you can do 2 things, add the page to a new binder (give the binder a name, description, tags, just like before) or add to an existing binder.
•You can even add the page as a sub tab and choose where it should go. When you add it the tool will test the page for 10 seconds and then you can go on your way.
I regularly will open all the pages I want to add to a binder in my browser and just go one by one using the tool.
Watch this video on the Livebinder It! tool.
Challenge
1.Your challenge (which I hope you choose to accept) is to explore some of the features I have described here to create your own binder.
2.Think about something that it taking up shelf space either physically or digitally and how you could organize it.
3.Be sure to look at the Featured binders on the Livebinders website for ideas.
Happy Livebindering!
Special thanks to Steven W. Anderson for the directions on how to use Livebinder.You can find Steven on Twitter (@web20classroom) or his blog, The Web 2.0 Connected Classroom (http://web20classroom.blogspot.com).
Happy learning!
Vicky Sahlin


